

Metal detector main menu key key function
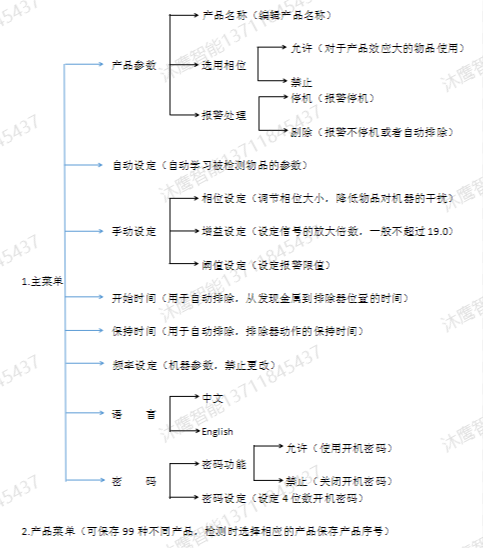
Note: When setting manually, the threshold value, gain size and sensitivity are proportional, that is, the larger the number, the higher the sensitivity.
1. Pass the object to be detected through the detector, observe the number of indicator lights on the display panel, and determine the size of the product's interference signal.
2. Enter the main menu. Objects with large interference signals for products. First, select the selected phase in the product parameter setting as allowed (for products with small product interference signals, the phase is not enabled, and the selected phase is selected as disabled)
3. Manual setting:
①Reduce the gain value in the manual setting appropriately or increase the threshold value appropriately, so that the number of indicator lights on the display panel is about 10 to 16, so as to adjust the phase.
②Increase or decrease the reference phase by 45° or 90° (the reference phase of the metal detector is 108° or 104.9°), pass the inspected product, and observe the number of indicator lights on. The opposite direction adjusts the phase. Until the product passes the detector, the number of indicator lights is the least or no indicator light is on.
③ Increase the gain value (generally not more than 19.0) or increase the threshold value to increase the number of indicator lights, and then carefully adjust the phase in small increments. Minimize the number of indicator lights when the product passes through, that is, when the product passes through the detector, the indicator light on the display board does not light up in red. Then pass the test card through the detector, and the corresponding metal substance of the product can be detected, and the parameter setting is successful.
1. Turn on the power
Open the power distribution box at the lower right corner of the front of the device, press the power switch to turn the power ON. After the detection level display LEDs on the display unit light up in order from the left, the [Basic] screen is displayed.
|
01JAM stop |
[Basic] screen
New product registration includes product serial number, product name, phase selection, NG stop, gain, phase, and threshold settings.
2.1 Product number
If you press the [Product] key from the [Basic] screen, the [Product] screen is displayed.
|
01 02JAM 03 04 |
If you select [01], press the [OK] key, register the serial number, and return to the [Basic] screen, where 99 products can be saved.
2.2 Product parameters
In order to register a new product, the [Product] menu screen is displayed, and the basic setting of the product is performed.
|
1 Product name |
Enter the product name in [product name]
Press the [arrow] key, align the cursor with the position of the input text (alphanumerics, kana, and symbols), and press the [OK] key to input in the [product name area]. Move left, move right Press the [arrow] key to align the position of [move left] or [move right], press the [OK] key, the text selection position of [product name area] will be left or right move.
After inputting the product name, press the [arrow] key, align the cursor to the position of [OK], and press the [OK] key to register the product name.
2.3 Select the phase
From the [Product Parameters] screen, press the [Up]∧, [Down]∨ keys to select [Select Phase], and press the [Enter] key to enter [Select Phase].
|
select phase |
Press [Left]<, [Right]>, select [Allow], press [Enter], the phase is allowed; select [Disable], press [Confirm], the phase is disabled. Return to the [Product Parameters] screen.
2.4 Alarm handling
If you press the [Up]∧, [Down]∨ keys from the [Product Parameters] face, select [Alarm Processing], and press the [Confirm] key to enter [Alarm Processing].
|
Alarm handling |
Press [Left]<, [Right]>, select [Allow], press [Confirm], the belt will stop running when the alarm occurs; select [Stop], press [Confirm], select when Reject, the belt will continue to run when the alarm occurs.
2.5 Phase setting
From the [Manual Setting] screen, press the [Up]∧, [Down]∨ keys to select [Phase], and press the [Enter] key to enter [Phase].
|
phase 107.5 |
Press the [Up]∧, [Down]∨ keys to increase and decrease the phase value respectively, press the [Left]<, [Right]> keys to double increase and decrease the phase value. Press the [OK] key, the current phase value is saved, and press the [Cancel] key to give up the operation. Return to the [Product Parameters] screen.
2.6 Gain setting
From the [Manual setting] side, press the [Up]∧, [Down]∨ keys to select [Gain], and press the [Enter] key to enter [Gain].
|
gain 19.0 19.0 |
Because this device uses the magnetic field of 2 frequency bands for inspection at the same time, the gain is as shown above.
Press the [Left]<, [Right]> keys to select the left (T channel) and right (P channel) gain values respectively, and press the [Up]∧, [Down]∨ keys to increase and decrease the gain value respectively. Press the [OK] key, the current gain value is saved, and press the [Cancel] key to abandon the operation. Return to the [Product Parameters] screen.
The larger the gain value, the higher the sensitivity, otherwise the lower, generally not more than 19.0 19.0
2.7 Threshold setting
|
threshold 2.5 |
Press the [Up]∧, [Down]∨ keys to increase and decrease the threshold respectively, and press the [Left]<, [Right]> keys to double increase and decrease the threshold. Press the [OK] key, the current threshold value is saved, and press the [Cancel] key to abandon the operation. Return to the [Product Parameters] screen.
The larger the threshold value, the higher the sensitivity, and vice versa
3. Automatic setting (all automatic execution)
On the [Basic] screen, press the [Menu] key to display the [Menu] screen; if [Auto Setting] is selected, press the [Enter] key to display the [Auto Setting] screen.
|
01 wait |
After a few seconds, the prompt [Incoming Product
|
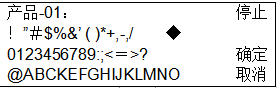
Product-01 inflow product |
The product to be inspected is conveyed by the operator and flows into the product. If [Automatic setting failed], press the [Cancel] key to return to the [Menu] screen, and repeat the first step until [Automatically set successfully]. The detection sensitivity must be checked after the automatic setting is completed.
Notes on automatic setting:
Ø The standard workpiece should be conveyed on the assembly line in the same direction and attitude as the inspected product normally conveyed on the assembly line.
Ø When the thickness of the standard workpiece is less than 5mm and the optical axis of the photocell is not blocked, the optical axis should be blocked by hand when the standard workpiece approaches the detector head.
Ø The inspected products of bulk cargo should be automatically set in the state of being put into the bag.
Ø With the automatic setting function, the most suitable detection conditions can be set. However, due to the influence of external noise and other interference factors, the detection conditions may change.
Ø If there is a difference in the characteristics of the standard workpiece—the product actually conveyed on the assembly line or the conveying direction is different, the actual conveyed quilt will be misdetected during operation.
4. Select a product
From the [Basic] screen, press the [Item] product key to display the [Item List] screen.
|
01 HAM 500g 02 COOKIE 03 JAM 04 HAMBURGUR |
Use the [UP]∧, [DOWN]∨ keys to select the type to be checked, and press the [OK] key.